What if your camera could sense your boredom and instantly slap on a filter that makes you look laser-focused?
How cool would it be to have a camera that always covers for you?
Wait, but how can it decipher what’s going on in your mind? How can a machine understand your emotions from your face?
The answer lies in the incredible world of Computer Vision(CV). It’s a field of AI that allows machines to “see” and “understand” the world as we do. From the Face ID unlocking your phone to the perfectly placed Snapchat filters, CV is everywhere. It’s the reason your camera takes a selfie when you show your palm and the reason you can search for something through images.
Are you already thinking about the long lines of code and the complicated math involved in building something like this? Or maybe you’re someone with minimal coding experience, daring to step into the world of CV but worried you’ll drown in complexity? Worry not, dear friends, Google’s MediaPipe has come to the rescue!
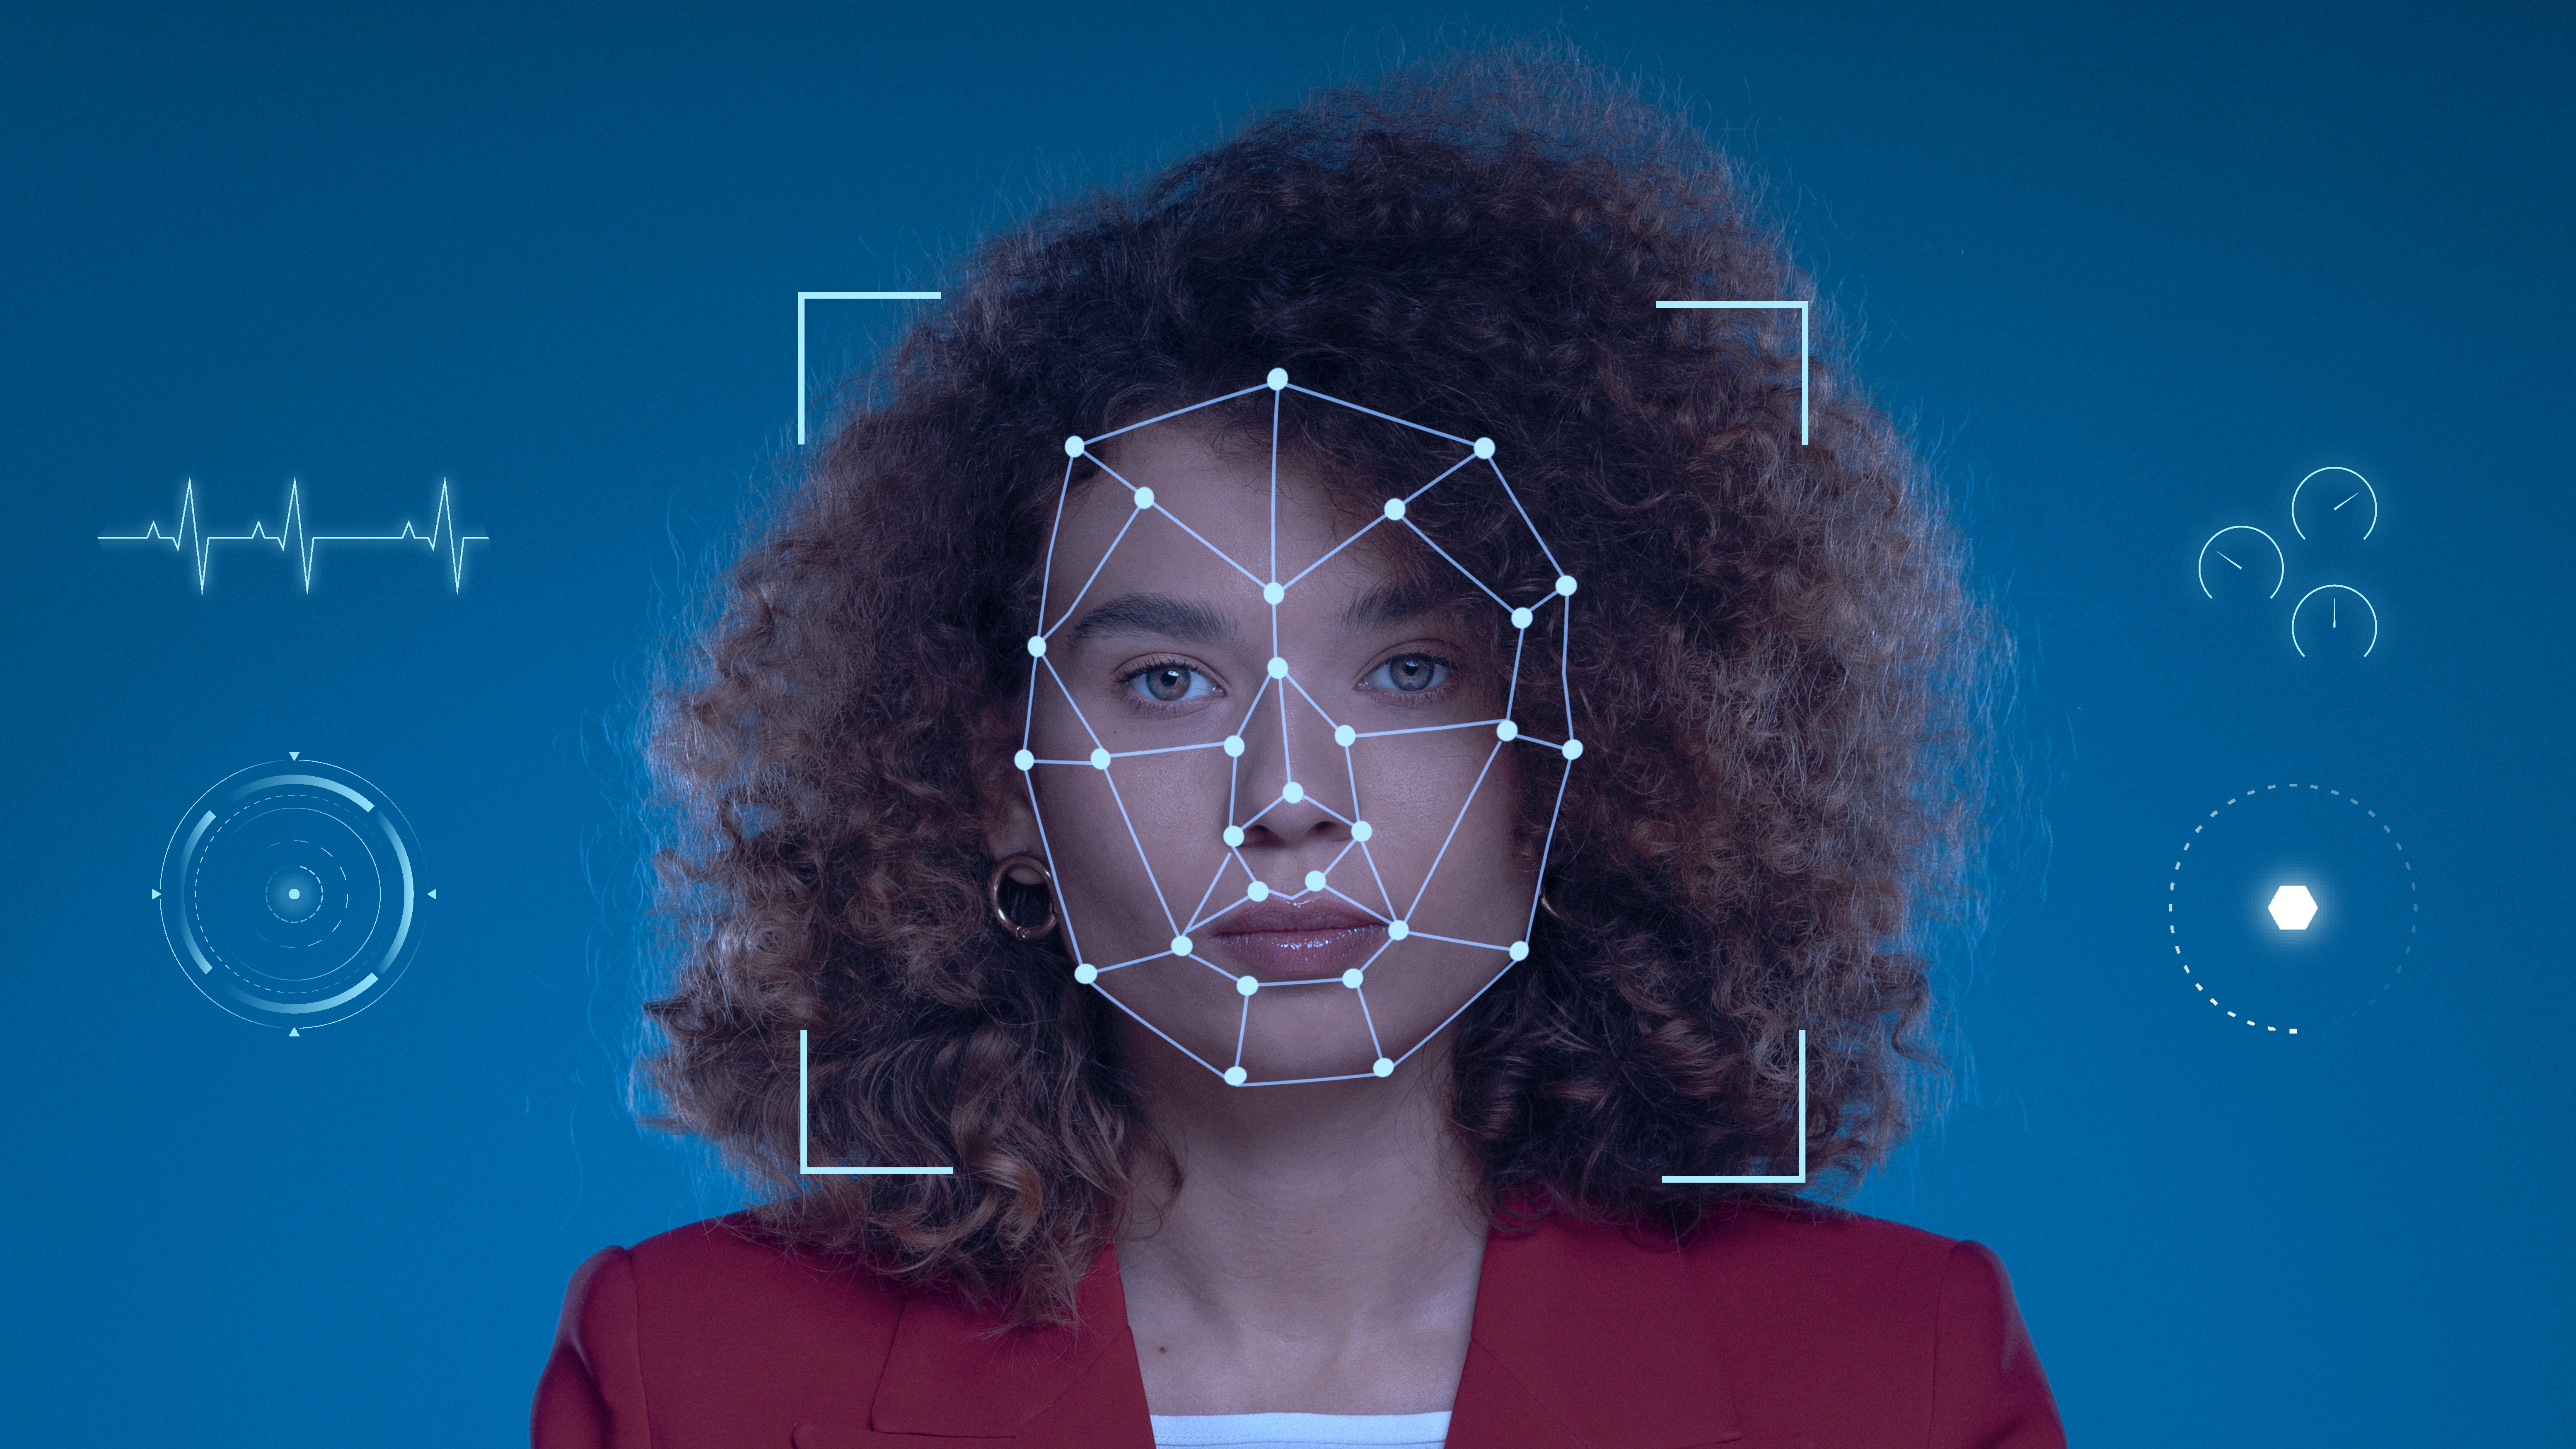
MediaPipe is an open-source framework that brings machine learning directly to your device. No PhD required, no supercomputers needed, no cloud servers sending your face data to mysterious locations. It’s very lightweight, and it comes with pre-trained models that don’t require you to collect thousands of face images or train for hours. Import the library, write a few lines of code, and you’re tracking faces.
At the heart of MediaPipe’s emotion detection is Face Mesh, a solution that detects 468 3D facial landmarks in real-time. It’s like a 3D graph capturing all your facial features and plotting them as points. Tracking how these 468 points move relative to each other creates a mathematical representation of your expressions.
So how exactly does it work?
Stage 1:
Step 1: Cut the nonsense.
It scans the entire image looking for a face and marks the face. This drastically reduces the unnecessary processing of the background elements.
Step 2: Map the terrain.
Now that it has a cropped face region, it places 468 precise 3D points across your entire facial surface — nose tip, eyebrow corners, lip edges, everything. Think of it like a cartographer mapping every hill and valley on a small island, but the island is your face and the map is built in milliseconds.
Each point has three coordinates (x, y, z). The z coordinate denotes the depth. These points are not random, they’re mathematically derived, not pixel-dependent and therefore strategic. But why 468 points? Because emotions are subtle! A real smile vs. a fake smile? That’s a difference of maybe 2–3 millimeters in how your cheek muscles lift. More dots = more precision.
Stage 2: Normalization
Raw coordinates are sensitive to head pose and camera distance.
Imagine taking photos of 100 different people, but:
Some are selfies (close-up) Some are taken from across the room (far away) Some people are tilting their heads So what do we do in this case?
Procrustes Analysis It is the automatic tool that:
- Rotates all faces to the same upright angle
- Scales them to the same size
- Aligns them to the same center point
This is done using a transformation matrix (rotation + scale + translation).
Now every face is in the same “pose” and you can fairly compare the actual facial expressions. By normalizing the position early, the neural network doesn’t have to learn “what if the face is tilted? what if they’re far away? What if…” Instead, it gets a consistently framed face every time and can dedicate all its brain power to precision.
Here’s the best part: You don’t need to store or transmit the actual image! What gets saved: 468 points × 3 coordinates = 1,404 numbers What gets deleted: The actual photo of your face.
Stage 3: Feature Extraction
Once you have 468 points, how do you detect emotions?
First, we extract the features that we want to analyze.
Without feature extraction:
Computer: “I see coordinates (0.234, 0.567, 0.012)… no idea what that means for emotions ”
With feature extraction:
Computer: “smile_score = 0.92, which is highly positive, so this is probably happiness!”
Approach 1: Geometric Feature Engineering (The Ruler Method) :
This is involves manually defining the measurements based on domain knowledge (like FACS — Facial Action Coding System). Instead of saying “she looks sad,” FACS breaks down EVERY facial expression into tiny, individual muscle movements called Action Units (AUs). Emotions aren’t single movements — they’re combinations of AUs!
Though you cannot calculate random distances (like for instance the distance between your left ear and right nostril) and label it as an emotion. Garbage features that don’t correlate with emotions. You need to choose the right features and hence, domain knowledge is required. This method is very tedious and cannot detect texture-based expressions (like forehead wrinkles for brow lowering).
Approach 2: Deep Learning on Raw Coordinates (The AI Method):
In this method you feed all 468 × 3 = 1,404 coordinates directly into a neural network and let it figure out the patterns.
We calculate the Difference Vector (Δ):
Capture your “neutral resting face” → Coordinates A
Capture your “peak emotional face” → Coordinates B
Calculate: Δ = B — A (the change)
Or you can this of it like this:
Δ = (Identity + Expression) - (Identity + Neutral)
Δ = Expression - Neutral
Δ = Pure Expression
This Δ vector contains ONLY the emotional deformation, removing your unique facial structure. By subtracting away the neutral face, you’re essentially saying: “I don’t care what you look like normally. I only care about HOW YOUR FACE CHANGED.” And since everyone’s face changes in similar ways when feeling the same emotion (smile → corners go up), the difference vectors capture the universal pattern of emotion while ignoring the unique structure of each face.
Approach 3: Blendshape Scores (MediaPipe’s Built-in Cheat Codes)
Using MediaPipe’s built-in semantic outputs instead of raw coordinates, we can speed up our processing. Think of blendshapes as MediaPipe saying, “I’ve already done the hard work for you!” Instead of manually measuring distances or training a neural network from scratch, MediaPipe gives you 52 pre-calculated blendshape scores. These are basically emotion coefficients that tell you exactly how much of each facial expression is present.
Examples:
| Blendshape | Meaning | Range |
|---|---|---|
| mouthSmileLeft | Smile intensity | 0.0 → 1.0 |
| eyeBlinkLeft | Blink level | 0.0 → 1.0 |
| browDownLeft | Brow furrow | 0.0 → 1.0 |
This Δ vector contains ONLY the emotional deformation, removing your unique facial structure.
By subtracting away the neutral face, you’re essentially saying:
“I don’t care what you look like normally. I only care about HOW YOUR FACE CHANGED.”
And since everyone’s face changes in similar ways when feeling the same emotion (smile → corners go up), the difference vectors capture the universal pattern of emotion while ignoring the unique structure of each face.
Stage 4: Classification
Once you’ve extracted features, you need something to say “these features = happiness!”
Option 1: Traditional ML (Random Forest or SVM):
What it is: Classic machine learning algorithms that learn decision rules.
How it Works:
- Random Forest:
Learns human-readable rules through repeated yes/no questions (builds decision trees)
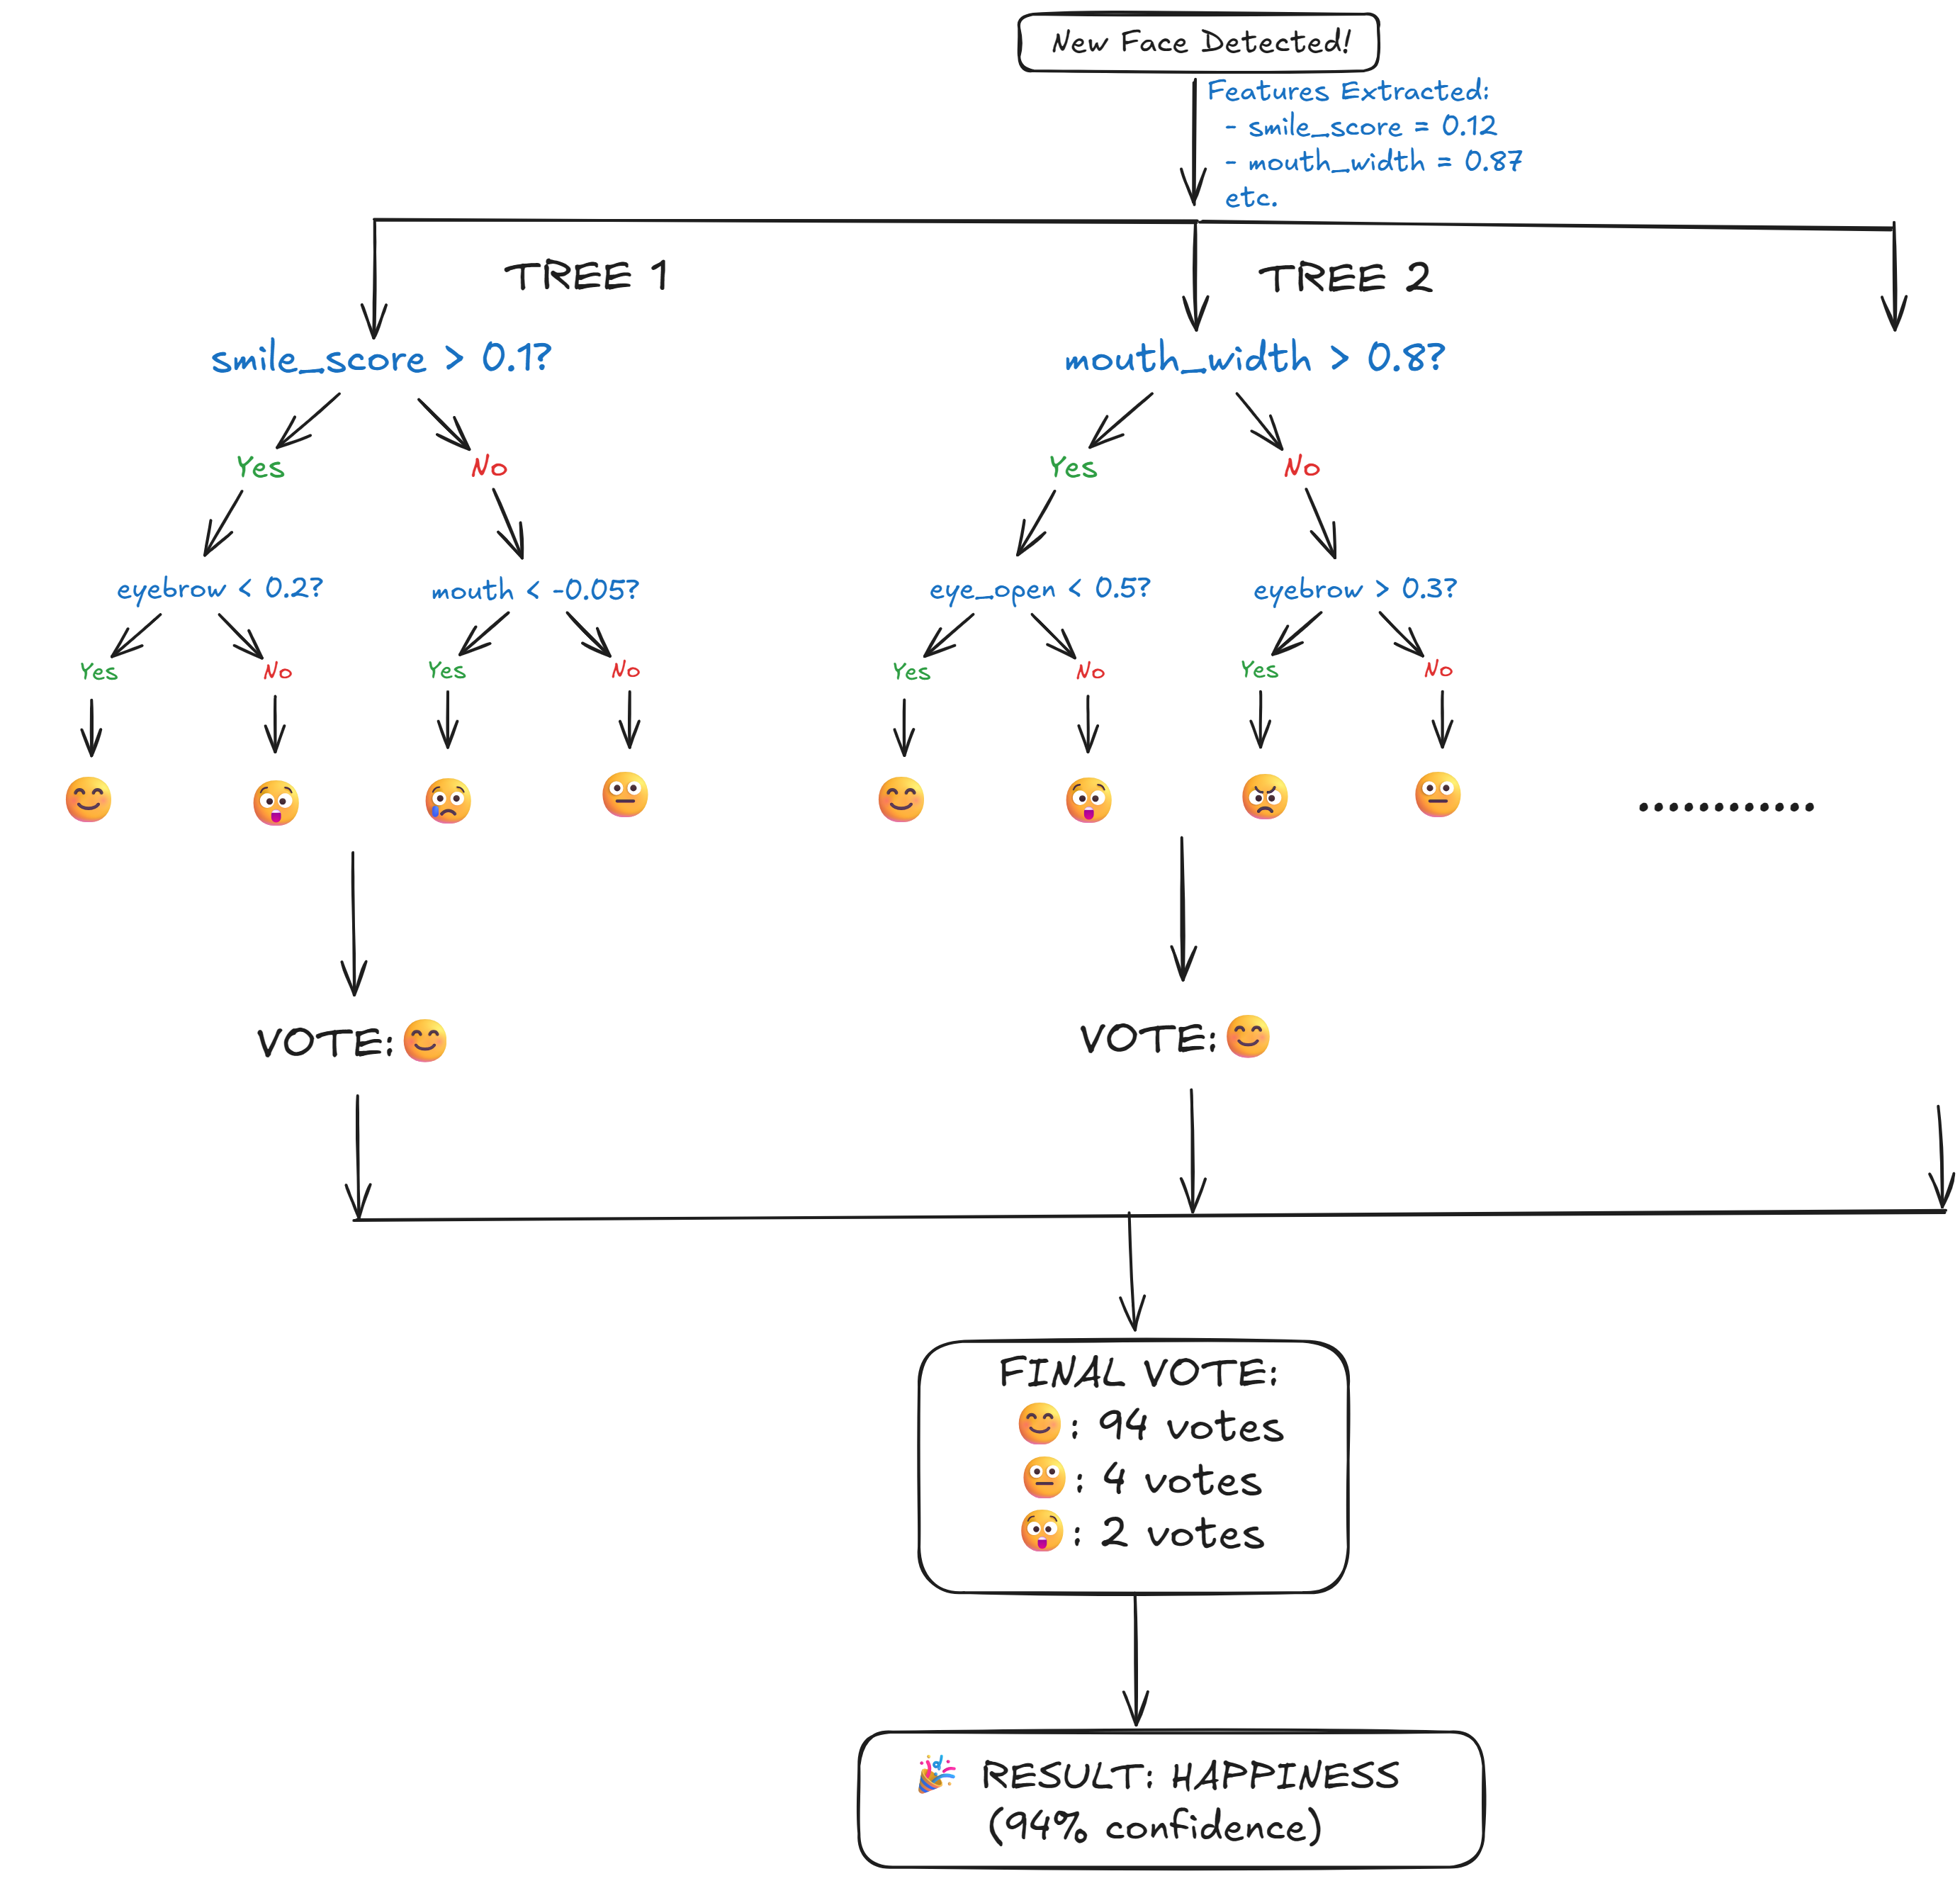
Asks sequential questions → votes
2. SVM:
Learns mathematical boundaries that separate emotion clusters in space.
Plots position → finds nearest boundary
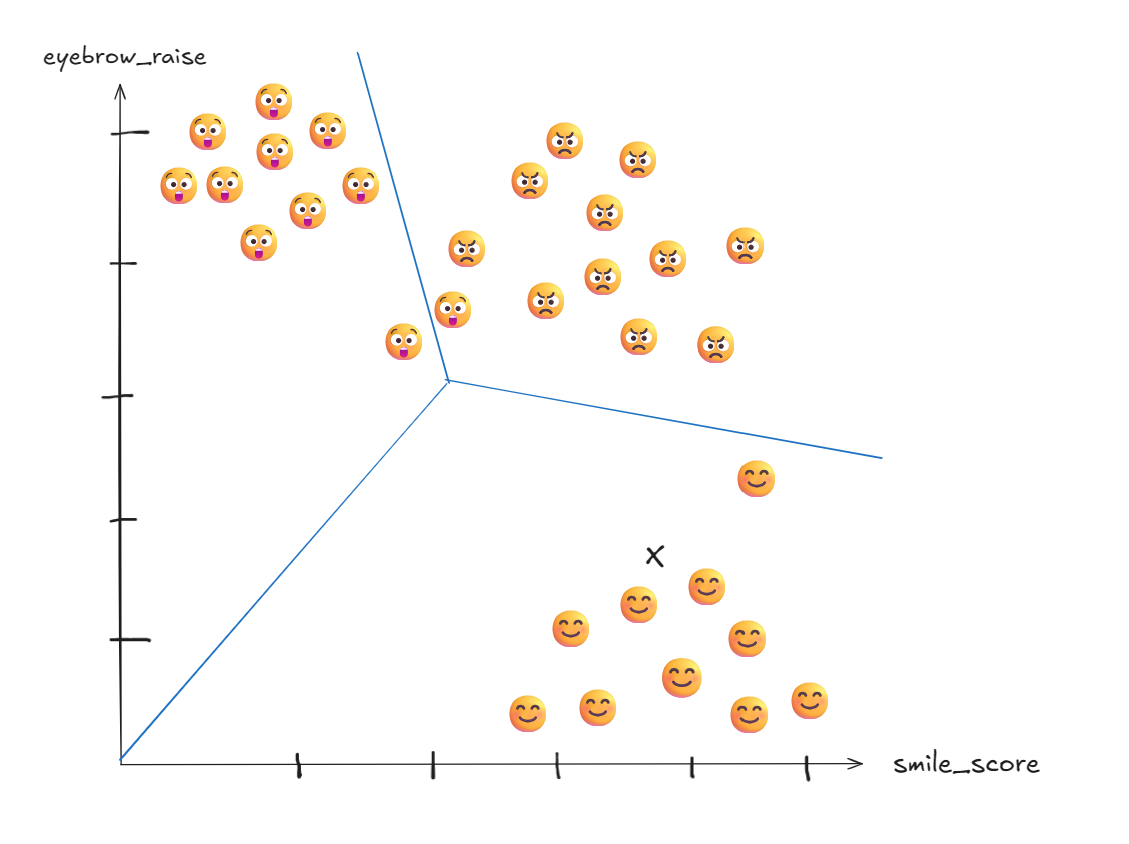 Prediction for X: 😊 HAPPINESS
Option #2: Deep Learning (CNN, GNN, MLP):
Types:
- CNN (Convolutional Neural Network): Good for spatial patterns in coordinate grids.
- GNN (Graph Neural Network): Perfect for facial landmarks (they’re literally a graph of connected points!)
- MLP (Multi-Layer Perceptron): A Simple neural network for vector data. Implementation: Use individually or combine based on your needs (e.g., GNN for facial structure + MLP for final classification).
Final Pipeline:
To sum it all up:
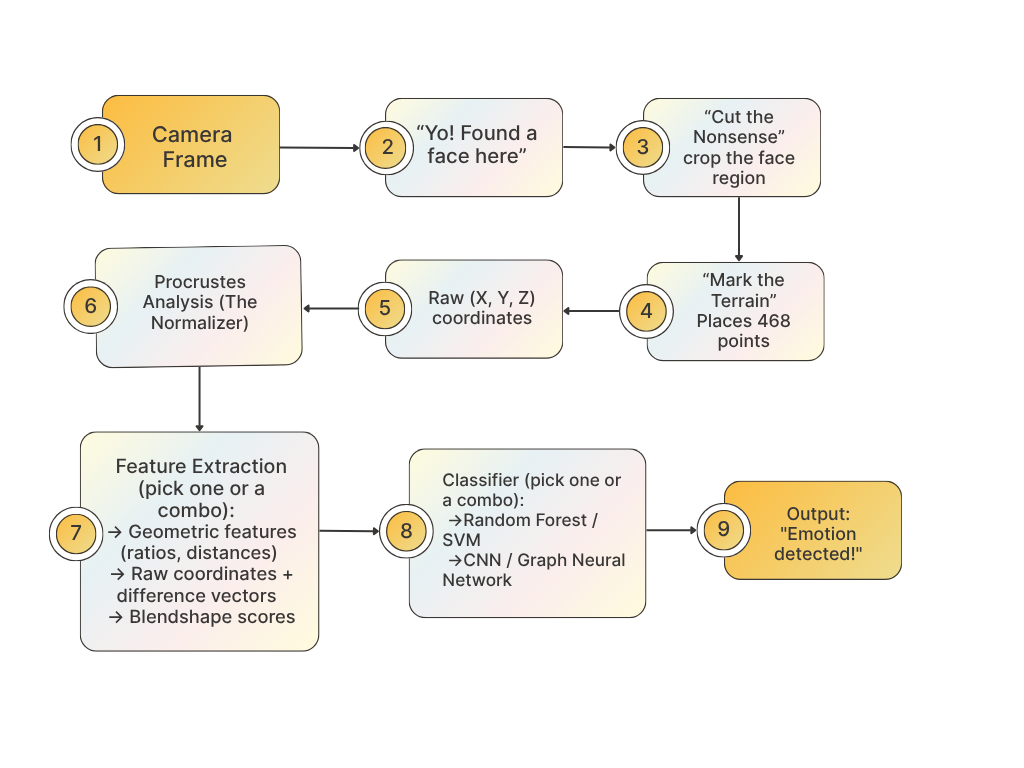
Try It Yourself!
Now that you understand the pipeline — let’s code it.
Installation:
pip install mediapipe opencv-python numpyOr for Jupyter users:
!pip install mediapipe opencv-python matplotlib numpyImports:
import time
import cv2
import numpy as np
import mediapipe as mp
Load your weapons:
mp_drawing = mp.solutions.drawing_utils  # Draws pretty landmarks on faces
mp_pose = mp.solutions.pose  # Detects body pose (shoulders, arms, etc.)
mp_face_mesh = mp.solutions.face_mesh  # The star of the show - detects 468 face points!
The get_landmark_coords function:
Converts MediaPipe’s 0–1 coordinates to real pixel values.
def get_landmark_coords(landmarks, landmark_index, img_shape):
    h, w, _ = img_shape # Get image height, width ('_' means ignore color channels)
    lm = landmarks.landmark[landmark_index]  # Grab the specific landmark point
    return (lm.x * w, lm.y * h) # MediaPipe gives fractions, multiply by dimensions to get real pixel coordinates
The detect_emotion function:
The emotion detective! Analyzes face geometry to guess what you’re feeling.
def detect_emotion(face_landmarks, img_shape):
    # STEP 1: Grab the mouth landmarks (we need these for EVERY emotion)
    upper_lip = get_landmark_coords(face_landmarks, 13, img_shape)  # Top of mouth
    lower_lip = get_landmark_coords(face_landmarks, 14, img_shape)  # Bottom of mouth
    left_mouth_corner = get_landmark_coords(face_landmarks, 61, img_shape)  # Left smile corner
    right_mouth_corner = get_landmark_coords(face_landmarks, 291, img_shape)  # Right smile corner

    # STEP 2: Calculate inter-ocular distance
    # Why? Because everyone's face is different sizes, but proportions stay similar
    left_eye_inner = get_landmark_coords(face_landmarks, 133, img_shape)  # Inner corner of left eye
    right_eye_inner = get_landmark_coords(face_landmarks, 362, img_shape)  # Inner corner of right eye
    # np.linalg.norm = fancy math speak for "distance between two points"
    inter_ocular_distance = np.linalg.norm(np.array(left_eye_inner) - np.array(right_eye_inner))

    # Safety check: if eyes aren't detected properly, bail out gracefully
    if inter_ocular_distance == 0:
        return "Neutral"  # Can't measure without a ruler!

    # STEP 3: Calculate normalized mouth features
    # Dividing by inter_ocular_distance makes it work for all face sizes (tiny baby or giant adult!)
    mouth_openness = np.linalg.norm(np.array(upper_lip) - np.array(lower_lip)) / inter_ocular_distance
    mouth_width = np.linalg.norm(np.array(left_mouth_corner) - np.array(right_mouth_corner)) / inter_ocular_distance

    # STEP 4: Check for SURPRISE 😲
    # Rule: Big open mouth + eyebrows way up = "OMG WHAT?!"
    left_eyebrow_top = get_landmark_coords(face_landmarks, 105, img_shape)  # Top of left eyebrow
    left_eye_top = get_landmark_coords(face_landmarks, 159, img_shape)  # Top of left eye
    eyebrow_raise = (left_eye_top[1] - left_eyebrow_top[1]) / inter_ocular_distance  # How far up are the brows?
    if mouth_openness > 0.4 and eyebrow_raise > 0.2:  # Both conditions must be true!
        return "Surprise"

    # STEP 5: Check for FEAR 😨
    # Rule: Wide open eyes + moderately open mouth = "RUN AWAY!"
    left_eyelid_upper = get_landmark_coords(face_landmarks, 159, img_shape)  # Top eyelid
    left_eyelid_lower = get_landmark_coords(face_landmarks, 145, img_shape)  # Bottom eyelid
    left_eye_openness = np.linalg.norm(np.array(left_eyelid_upper) - np.array(left_eyelid_lower)) / inter_ocular_distance
    if left_eye_openness > 0.2 and mouth_openness > 0.3:  # Eyes wide + mouth open
        return "Fear"

    # STEP 6: Check for DISGUST 🤢
    # Rule: Nose wrinkled up toward face + mouth barely open = "Eww, gross!"
    upper_lip_y = get_landmark_coords(face_landmarks, 13, img_shape)[1]  # Y-coordinate of upper lip
    nose_tip_y = get_landmark_coords(face_landmarks, 4, img_shape)[1]  # Y-coordinate of nose tip
    disgust_score = (nose_tip_y - upper_lip_y) / inter_ocular_distance  # Distance between nose and lip
    if disgust_score > 0.15 and mouth_openness < 0.1:  # Wrinkled nose + closed mouth
        return "Disgust"

    # STEP 7: Check for ANGER 😠
    # Rule: Eyebrows squeezed together (furrow) + mouth corners down = "Grr!"
    left_inner_eyebrow = get_landmark_coords(face_landmarks, 55, img_shape)  # Inner part of left brow
    right_inner_eyebrow = get_landmark_coords(face_landmarks, 285, img_shape)  # Inner part of right brow
    eyebrow_furrow = np.linalg.norm(np.array(left_inner_eyebrow) - np.array(right_inner_eyebrow)) / inter_ocular_distance

    # Calculate if mouth is turning down (frown direction)
    mouth_corners_y = (left_mouth_corner[1] + right_mouth_corner[1]) / 2  # Average Y of corners
    mouth_center_y = (upper_lip[1] + lower_lip[1]) / 2  # Average Y of lip center
    mouth_downturn = (mouth_corners_y - mouth_center_y) / inter_ocular_distance  # Positive = frown

    if eyebrow_furrow < 0.3 and mouth_downturn > 0.05:  # Brows close together + frown
        return "Anger"

    # STEP 8: Check for HAPPINESS 😊 or SADNESS 😢
    # The smile test! It's all about whether mouth corners are higher or lower than center
    smile_score = (mouth_center_y - mouth_corners_y) / inter_ocular_distance
    # Positive score = corners are UP (smile!), Negative = corners are DOWN (sad!)

    if smile_score > 0.05:  # Mouth corners higher than center = YOU'RE SMILING!
        return "Happiness"
    if smile_score < -0.05:  # Mouth corners lower than center = big sad :(
        return "Sadness"

    # STEP 9: If nothing else triggered, you've got a perfect poker face
    return "Neutral"
The main() function:
Where execution begins.

def main():

    # Tell the program which image to analyze (CHANGE THIS to your actual image!)
    image_path = "your_image.jpg"
    frame = cv2.imread(image_path)  # cv2.imread = "hey OpenCV, load this image file"

    # Error handling: Did the image actually load, or did we get nothing?
    if frame is None:
        print(f"Error: Could not read the image from {image_path}")
        return  # Exit gracefully instead of crashing

    # Initialize MediaPipe models (these are the AI brains!)
    # static_image_mode=True = "this is a photo, not a video"
    # min_detection_confidence=0.5 = "only detect if you're at least 50% sure"
    pose = mp_pose.Pose(static_image_mode=True, min_detection_confidence=0.5, min_tracking_confidence=0.5)
    face_mesh = mp_face_mesh.FaceMesh(static_image_mode=True, max_num_faces=1, min_detection_confidence=0.5, min_tracking_confidence=0.5)

    try:
        # Convert image from BGR to RGB (OpenCV uses BGR, MediaPipe uses RGB - why? ¯\_(ツ)_/¯)
        rgb = cv2.cvtColor(frame, cv2.COLOR_BGR2RGB)

        # ACTION TIME! Run the AI models - this is where the magic happens
        results_pose = pose.process(rgb)  # Detect body: shoulders, elbows, hips, etc.
        results_face = face_mesh.process(rgb)  # Detect face: all 468 landmarks!

        emotion = "Neutral"  # Default emotion if no face is found

        # If MediaPipe found a face, let's draw it and detect emotion!
        if results_face.multi_face_landmarks:
            for face_landmarks in results_face.multi_face_landmarks:  # Loop through all detected faces (usually just 1)
                # Draw the face mesh - those fancy interconnected dots and lines
                mp_drawing.draw_landmarks(
                    image=frame,  # Draw on this image
                    landmark_list=face_landmarks,  # These are the 468 points
                    connections=mp_face_mesh.FACEMESH_TESSELATION,  # Connect the dots!
                    landmark_drawing_spec=None,  # Don't draw the dots themselves
                    connection_drawing_spec=mp_drawing.DrawingSpec(color=(200,200,200), thickness=1, circle_radius=1)  # Gray lines
                )

                # Now run our emotion detection magic!
                emotion = detect_emotion(face_landmarks, frame.shape)

        # If MediaPipe found a body pose, draw the skeleton too!
        if results_pose.pose_landmarks:
            mp_drawing.draw_landmarks(
                frame,  # Draw on this image
                results_pose.pose_landmarks,  # Body joint positions
                mp_pose.POSE_CONNECTIONS,  # Connect shoulders to elbows, etc.
                mp_drawing.DrawingSpec(color=(0, 255, 0), thickness=2, circle_radius=3),  # Green dots for joints
                mp_drawing.DrawingSpec(color=(0, 128, 255), thickness=2)  # Orange lines connecting joints
            )

        # Add text overlay showing the detected emotion (top-left corner)
        # Parameters: image, text, position, font, size, color (BGR!), thickness, anti-aliasing
        cv2.putText(frame, f"Emotion: {emotion}", (10, 70), cv2.FONT_HERSHEY_SIMPLEX, 1, (0, 0, 255), 2, cv2.LINE_AA)

        # Display the final masterpiece in a window
        cv2.imshow("Emotion Detection", frame)  # Show the image
        cv2.waitKey(0)  # Wait forever until you press ANY key (then close)

    finally:
        # Clean up properly - close models and windows (like washing dishes after cooking!)
        pose.close()  # Release the pose model from memory
        face_mesh.close()  # Release the face mesh model from memory
        cv2.destroyAllWindows()  # Close all OpenCV windows
main() function:
Handles image loading, model execution, and emotion display.And lastly, the Python tradition: only run main() if this script is executed directly (not imported)
if __name__ == "__main__":
    main()
You can download and run this code for live video capture as well as static images from this GitHub link.
Written By

Samiksha Patil
Computer Science Student • AI Enthusiast • Writer